Configuring your iPhone with e-mail: Difference between revisions
No edit summary |
No edit summary |
||
| Line 1: | Line 1: | ||
'''1)''' The first step is to open the ''Settings'' app on your iPhone, and then scroll down to the ''Mail, Contacts, Calendars'' button and press that, as shown below: | |||
[[Image:iphonetut1.png]] | [[Image:iphonetut1.png]] | ||
'''2)''' Next, click the ''Add Account'' button as below to begin configuring your new email account. Note that the ''Mail, Contacts, Calendars'' settings is where you would configure how often your iPhone downloads new emails, as dictated by the ''Fetch New Data'' option. | |||
[[Image:iphonetut2.png]] | [[Image:iphonetut2.png]] | ||
'''3)''' From the ''Add Account'' screen, select ''Other'' as the type of email account you are adding. Bravenet emails use the POP3/IMAP mail retrieval protocols, and are not Microsoft Exchange accounts. | |||
[[Image:iphonetut3.png]] | [[Image:iphonetut3.png]] | ||
'''4)''' We are only adding a mail account, so press the ''Add Mail Account'' button next. | |||
[[Image:iphonetut4.png]] | |||
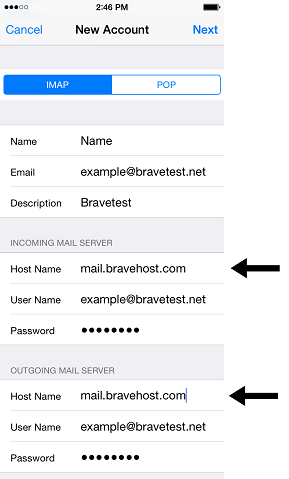
'''5)''' Now you will be putting in all of the information the email client requires. First, select from the top whether to use the ''IMAP'' or ''POP'' protocol; we always advise using IMAP on mobile devices, and your email will not operate properly if configured with POP on multiple devices. | |||
Next, create the display name and short description of the account by filling in the ''Name'' and ''Description'' fields respectively. | |||
You will have to set the ''Host Name'' of both the inbound and outbound mailserver to '''"mail.bravehost.com"''', minus the quotations. | |||
Finally, ensure that both mailservers are using the full email address as the username, and that you have put the correct password in for both servers. It should appear quite similar to the below image. | |||
[[Image:iphonetut5.png]] | |||
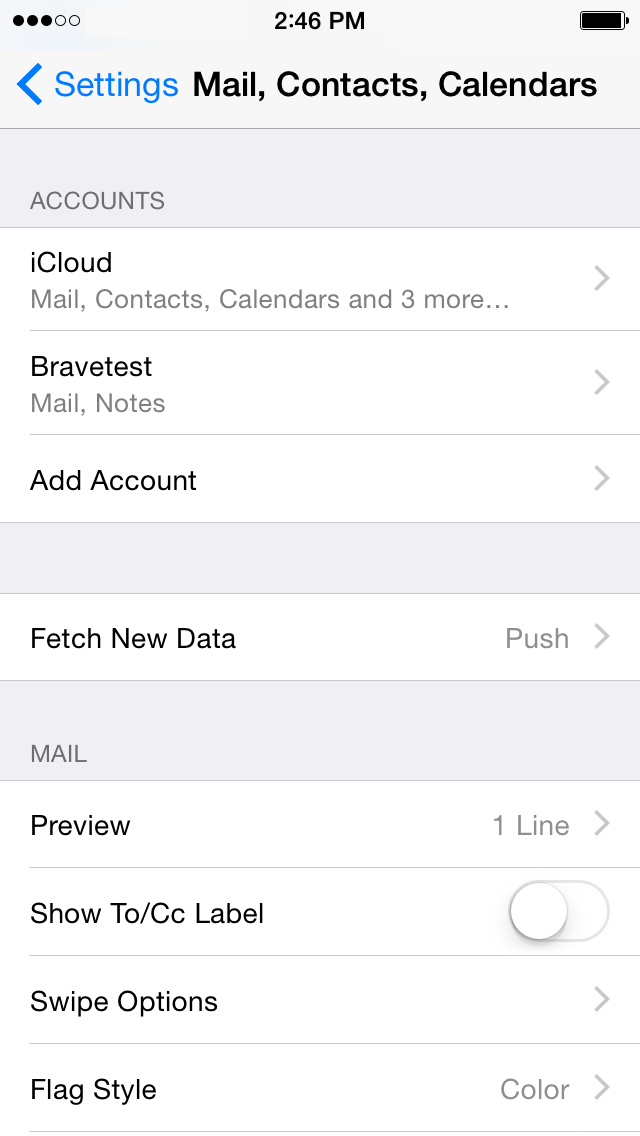
'''6)''' The email account is now created! You will see it listed in the ''Mail, Contacts, Calendars'' section of the ''Settings'' app, and may change the emails configuration settings at any point from the same location! | |||
[[Image:iphonetut6.png]] | |||
Revision as of 16:20, 6 October 2014
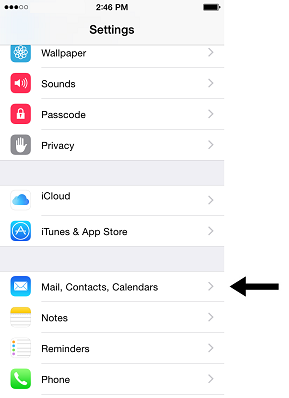
1) The first step is to open the Settings app on your iPhone, and then scroll down to the Mail, Contacts, Calendars button and press that, as shown below:
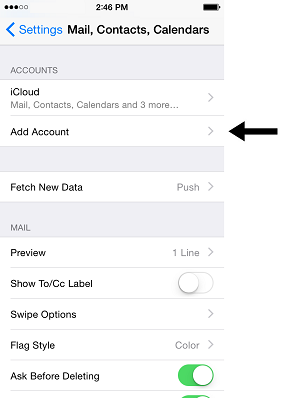
2) Next, click the Add Account button as below to begin configuring your new email account. Note that the Mail, Contacts, Calendars settings is where you would configure how often your iPhone downloads new emails, as dictated by the Fetch New Data option.
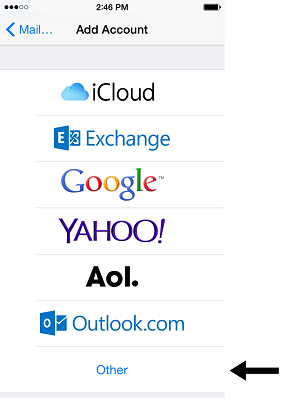
3) From the Add Account screen, select Other as the type of email account you are adding. Bravenet emails use the POP3/IMAP mail retrieval protocols, and are not Microsoft Exchange accounts.
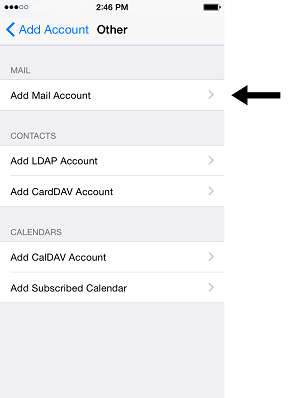
4) We are only adding a mail account, so press the Add Mail Account button next.
5) Now you will be putting in all of the information the email client requires. First, select from the top whether to use the IMAP or POP protocol; we always advise using IMAP on mobile devices, and your email will not operate properly if configured with POP on multiple devices.
Next, create the display name and short description of the account by filling in the Name and Description fields respectively.
You will have to set the Host Name of both the inbound and outbound mailserver to "mail.bravehost.com", minus the quotations.
Finally, ensure that both mailservers are using the full email address as the username, and that you have put the correct password in for both servers. It should appear quite similar to the below image.
6) The email account is now created! You will see it listed in the Mail, Contacts, Calendars section of the Settings app, and may change the emails configuration settings at any point from the same location!

