Move domain from Bravehost to Bravesites: Difference between revisions
No edit summary |
No edit summary |
||
| Line 10: | Line 10: | ||
# Navigate to the "Web Hosting" page. | # Navigate to the "Web Hosting" page. | ||
# Locate your website entry and click the blue "disable" text under the '''enabled''' column. | # Locate your website entry and click the blue "disable" text under the '''enabled''' column. | ||
'''Note:''' A disabled website will not be accessible via the websites domain. Any assets or resources connected to this FTP website will no longer function. | |||
== Step 2: Attach domain to Site Builder Website == | == Step 2: Attach domain to Site Builder Website == | ||
| Line 21: | Line 23: | ||
#: [[File:BravesitesAttachADomain.png]] | #: [[File:BravesitesAttachADomain.png]] | ||
# Select the domain you wish to use from the dropdown and click "continue". | # Select the domain you wish to use from the dropdown and click "continue". | ||
Your domain will now be attached to your Site builder website. | |||
Revision as of 09:09, 14 July 2017
To move a domain from your FTP Based (Bravehost) website over to your Site Builder (Bravesites) website. Please refer to the following steps below.
Step 1: Disable your FTP based Website
As you cannot have your domain attached to multiple live services at the same time, you will want to disable the Bravehost website. Disabling the Bravehost website will enable you to select the domain from the list of registered domains when it comes time to attach your domain to your Bravesites website later on.
To disable your FTP hosted website, please do the following:
- Navigate to the "Web Hosting" page.
- Locate your website entry and click the blue "disable" text under the enabled column.
Note: A disabled website will not be accessible via the websites domain. Any assets or resources connected to this FTP website will no longer function.
Step 2: Attach domain to Site Builder Website
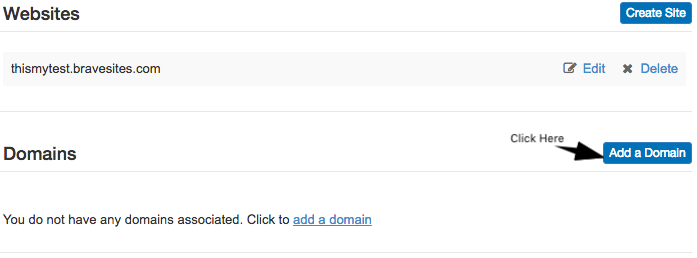
Once the website is disabled, you'll want to then navigate to the "Site Builder" page.
Once on the Site Builder page, please do the following:
- Under the domains heading locate and click on "add a domain"
- On the new page, under "Select a Domain Option", select Use one of my registered domain(s).
- Select the domain you wish to use from the dropdown and click "continue".
Your domain will now be attached to your Site builder website.
DNS Propagation
Once you click continue, you will be assigning the domain to your site builder website and in the process updating your domains DNS records. Anytime you make changes to the DNS records, it can take anywhere from a minimum of 1-3 hours, up to a maximum of 24 hours for DNS propagation to complete and update to the new values. During this period, you may notice that your website is attempting to connect to the old values even though they are no longer valid. As a result, you may see that your website is unavailable during that time.
DNS uses a caching mechanism defined by the TTL (time-to-live). When records are changed, the DNS network is updated and goes through a process known as propagation, where all the global DNS nodes are updated. This takes time to complete. During this propagation period, traffic to your site will be going to either the old servers or the new servers. Once propagation is complete, all traffic will be going to the new server.


