Microsoft Outlook 2013: Difference between revisions
No edit summary |
No edit summary |
||
| Line 1: | Line 1: | ||
Note - this is for Microsoft Outlook, as it ships with Microsoft Office (it has a yellow icon). This does not include [[Outlook Express]] (blue and white icon), which is installed by default on Windows XP - see the [[Outlook Express]] for instructions. | Note - this is for Microsoft Outlook, as it ships with Microsoft Office (it has a yellow icon). This does not include [[Outlook Express]] (blue and white icon), which is installed by default on Windows XP - see the [[Outlook Express]] for instructions. | ||
# Start Microsoft Outlook | # Start Microsoft Outlook<br/>[[File:Outlook2013File.png| File]] | ||
# Click | # Click on '''File'''<br/>[[File:Outlook2013AddAccount.png| Add Account]] | ||
# | # Click on '''Add Account'''<br/>[[File:Outlook2013ManualSetup.png| Manual Setup]] | ||
# Select '''Manually setup or additional server types''' then click '''Next'''<br/>[[File:Outlook2013Service.png| Service]] | |||
# Choose '''IMAP''' or '''POP3''' from the options then click '''Next''' | # Choose '''IMAP''' or '''POP3''' from the options then click '''Next''' | ||
# Fill out the following fields: | # Fill out the following fields:<br/>[[File:Outlook2013ServerConfig.png| Server Settings]] | ||
## '''Your Name''' - enter your name here | ## '''Your Name''' - enter your name here | ||
## '''E-Mail Address''' - enter the Bravenet email address you are adding here | ## '''E-Mail Address''' - enter the Bravenet email address you are adding here | ||
## '''Account Type''' - IMAP (or POP3) | |||
## '''Incoming mail server''' - enter mail.bravehost.com | ## '''Incoming mail server''' - enter mail.bravehost.com | ||
## '''Outgoing mail server''' - enter mail.bravehost.com | ## '''Outgoing mail server''' - enter mail.bravehost.com | ||
## '''Username''' - enter your Bravenet email address | ## '''Username''' - enter your Bravenet email address | ||
## '''Password''' - enter the password for the Bravenet email address | ## '''Password''' - enter the password for the Bravenet email address | ||
# Click the '''More Settings...''' button | # Click the '''More Settings...''' button<br/>[[File:Outlook2013OutgoingServer.png| Outgoing Server]] | ||
# Change to the '''Outgoing Server''' tab, and enable the '''My outgoing server require authentication''' checkbox | # Change to the '''Outgoing Server''' tab, and enable the '''My outgoing server require authentication''' checkbox<br/>[[File:Outlook2013Advanced.png| Advanced]] | ||
# Change to the '''Advanced tab''', and change the '''Outgoing Server port''' number from 25 (the default) to 587 | # Change to the '''Advanced tab''', and change the '''Outgoing Server port''' number from 25 (the default) to 587 | ||
# Also ensure | # Also ensure that '''Use the following type of encrypted connections''' is set to TLS. SSL will also work, but uses different port numbers. | ||
# Click the '''OK''' button to close the advanced settings window, then click '''Next''' on the E-Mail Accounts window | # Click the '''OK''' button to close the advanced settings window, then click '''Next''' on the E-Mail Accounts window | ||
# Click the '''Finish''' button on the next page and your account should now work correctly | # Click the '''Finish''' button on the next page and your account should now work correctly | ||
Make sure to send a test email to another email address you have access to to verify that everything is set up correctly. | Make sure to send a test email to another email address you have access to to verify that everything is set up correctly. | ||
Revision as of 16:52, 2 April 2014
Note - this is for Microsoft Outlook, as it ships with Microsoft Office (it has a yellow icon). This does not include Outlook Express (blue and white icon), which is installed by default on Windows XP - see the Outlook Express for instructions.
- Start Microsoft Outlook

- Click on File

- Click on Add Account

- Select Manually setup or additional server types then click Next

- Choose IMAP or POP3 from the options then click Next
- Fill out the following fields:

- Your Name - enter your name here
- E-Mail Address - enter the Bravenet email address you are adding here
- Account Type - IMAP (or POP3)
- Incoming mail server - enter mail.bravehost.com
- Outgoing mail server - enter mail.bravehost.com
- Username - enter your Bravenet email address
- Password - enter the password for the Bravenet email address
- Click the More Settings... button
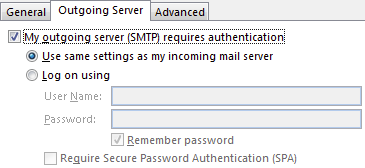
- Change to the Outgoing Server tab, and enable the My outgoing server require authentication checkbox
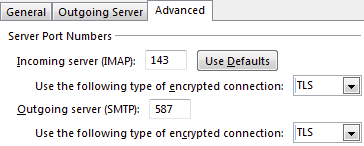
- Change to the Advanced tab, and change the Outgoing Server port number from 25 (the default) to 587
- Also ensure that Use the following type of encrypted connections is set to TLS. SSL will also work, but uses different port numbers.
- Click the OK button to close the advanced settings window, then click Next on the E-Mail Accounts window
- Click the Finish button on the next page and your account should now work correctly


Make sure to send a test email to another email address you have access to to verify that everything is set up correctly.