Site Builder Registration: Difference between revisions
No edit summary |
mNo edit summary |
||
| (14 intermediate revisions by 3 users not shown) | |||
| Line 1: | Line 1: | ||
__NOTOC__ | __NOTOC__ | ||
You can effortlessly create a website in minutes from your Bravenet account. We are proud to introduce our new and intuitive SiteBlocks website builder! We encourage you to try SiteBlocks to instantly create a beautiful, modern website right from your Bravenet dashboard using the steps below. We also offer the ability for existing users to create a website using our old website builder (please see the '[[Site Builder Registration#Old Website Builder Registration|Old Website Builder Registration]]' section below). | |||
==== '''SiteBlocks Registration''' ==== | |||
# Visit the ‘'''Site Builder'''’ tab. | |||
# Click ‘'''Add a new website'''’ (if this is your first website, see step 3). | |||
# You will be greeted with the SiteBlocks welcome screen, click ‘'''Get Started'''’. | |||
# Select from our array of beautiful and modern templates. | |||
# Next, choose your website address. Visit the ‘'''Choose Your Site Builder Address'''’ section below for further instructions on choosing a free subdomain or a paid domain. | |||
# Click ‘'''Create Site'''’ to generate your new SiteBlocks website. | |||
See ‘[https://help.siteblocks.com/entries/basics/building-your-first-website Building Your First Website]’ in our new [https://help.siteblocks.com/ SiteBlocks Help Center] for further details on setting up your website. We encourage you to explore the [https://help.siteblocks.com/ SiteBlocks Help Center] for helpful resources on getting started with your new SiteBlocks website. | |||
==== '''Old Website Builder Registration''' ==== | |||
'''''Note''': Our old website builder is only available to existing users. New accounts will only have access to our new SiteBlocks website builder.'' | |||
# Visit the ‘'''Site Builder'''’ tab. | |||
# Click ‘'''Add a new website'''’. | |||
# You will be greeted with the SiteBlocks welcome screen, click the ‘'''Old Site Builder'''’ hyperlink. | |||
# Select a theme to get started. | |||
# Next, choose your website address. Visit the ‘'''Choose Your Site Builder Address'''’ section below for further instructions on choosing a free subdomain or a paid domain. | |||
# Click ‘'''Create Site'''’ to generate your new website. | |||
[ | Visit our [https://wiki.bravesites.com/w/Main_Page Bravesites Help Center] for further resources on how to use our old website builder. | ||
==== '''Choose Your Site Builder Address''' ==== | |||
Before creating your website, you will need to choose a website address. Bravenet offers the ability to create a website using a free subdomain or a paid custom domain name. You will have the ability to easily rename the website at anytime, and our builder will automatically update any built-in page links once you rename your website. | |||
'''Option 1: Choosing A Free Subdomain''' | |||
[[File:Screenshot 2024-06-13 at 12.21.04 PM.png|none|thumb]] | |||
You can choose a free *.bravesites.com subdomain. This is a good option if you want to create a website without any additional domain name costs, or if you have not yet decided what your domain name will be. Simply select the '<nowiki/>'''I would like a Site Builder subdomain'''<nowiki/>' option and fill in the subdomain field with a unique website name. Then, click ''''Create Site'''<nowiki/>' to generate your new website. | |||
'''Option 2: Assigning Your Own Domain Name''' | |||
[[File:Screenshot 2024-06-13 at 12.21.50 PM.png|none|thumb]] | |||
If you have already registered your own custom domain name, you can assign it your website builder by selecting the '<nowiki/>'''Use one of my registered domains'''<nowiki/>' option, then select the domain from the dropdown. Then, click ''''Create Site'''<nowiki/>' to generate your new website. | |||
'''Option 3: Register A New Domain Name''' | |||
[[File:Screenshot 2024-06-13 at 12.21.55 PM.png|none|thumb]] | |||
You can purchase a new domain name by selecting the '<nowiki/>'''I want to register a New Domain Name'''<nowiki/>' option. Search for a new domain name in the search bar and you can purchase this domain if it is currently available. Once you have found the domain name of your chouce, click ''''Create Site'''<nowiki/>' to generate your new website. | |||
You can also purchase domain names at any time by navigating to the '<nowiki/>'''Domains'''<nowiki/>' tab in your account and then clicking ''''Register A Domain'''<nowiki/>'. | |||
Latest revision as of 12:00, 13 June 2024
You can effortlessly create a website in minutes from your Bravenet account. We are proud to introduce our new and intuitive SiteBlocks website builder! We encourage you to try SiteBlocks to instantly create a beautiful, modern website right from your Bravenet dashboard using the steps below. We also offer the ability for existing users to create a website using our old website builder (please see the 'Old Website Builder Registration' section below).
SiteBlocks Registration
- Visit the ‘Site Builder’ tab.
- Click ‘Add a new website’ (if this is your first website, see step 3).
- You will be greeted with the SiteBlocks welcome screen, click ‘Get Started’.
- Select from our array of beautiful and modern templates.
- Next, choose your website address. Visit the ‘Choose Your Site Builder Address’ section below for further instructions on choosing a free subdomain or a paid domain.
- Click ‘Create Site’ to generate your new SiteBlocks website.
See ‘Building Your First Website’ in our new SiteBlocks Help Center for further details on setting up your website. We encourage you to explore the SiteBlocks Help Center for helpful resources on getting started with your new SiteBlocks website.
Old Website Builder Registration
Note: Our old website builder is only available to existing users. New accounts will only have access to our new SiteBlocks website builder.
- Visit the ‘Site Builder’ tab.
- Click ‘Add a new website’.
- You will be greeted with the SiteBlocks welcome screen, click the ‘Old Site Builder’ hyperlink.
- Select a theme to get started.
- Next, choose your website address. Visit the ‘Choose Your Site Builder Address’ section below for further instructions on choosing a free subdomain or a paid domain.
- Click ‘Create Site’ to generate your new website.
Visit our Bravesites Help Center for further resources on how to use our old website builder.
Choose Your Site Builder Address
Before creating your website, you will need to choose a website address. Bravenet offers the ability to create a website using a free subdomain or a paid custom domain name. You will have the ability to easily rename the website at anytime, and our builder will automatically update any built-in page links once you rename your website.
Option 1: Choosing A Free Subdomain

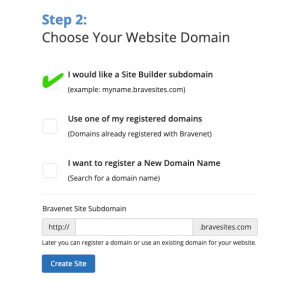
You can choose a free *.bravesites.com subdomain. This is a good option if you want to create a website without any additional domain name costs, or if you have not yet decided what your domain name will be. Simply select the 'I would like a Site Builder subdomain' option and fill in the subdomain field with a unique website name. Then, click 'Create Site' to generate your new website.
Option 2: Assigning Your Own Domain Name

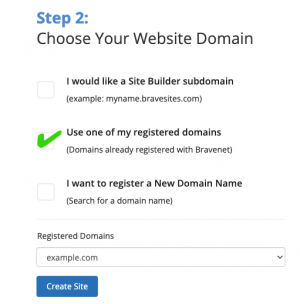
If you have already registered your own custom domain name, you can assign it your website builder by selecting the 'Use one of my registered domains' option, then select the domain from the dropdown. Then, click 'Create Site' to generate your new website.
Option 3: Register A New Domain Name

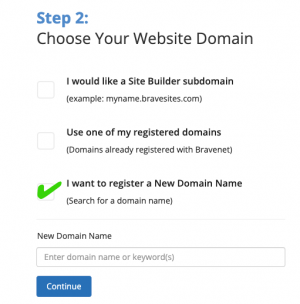
You can purchase a new domain name by selecting the 'I want to register a New Domain Name' option. Search for a new domain name in the search bar and you can purchase this domain if it is currently available. Once you have found the domain name of your chouce, click 'Create Site' to generate your new website.
You can also purchase domain names at any time by navigating to the 'Domains' tab in your account and then clicking 'Register A Domain'.
