Creating a bravesites website on a subdomain: Difference between revisions
Created page with "{{done}} A subdomain is, as the name suggests, a subdivision of a domain. For example, if you create a website on Bravenet when you haven't registered a domain, you get t..." |
|||
| (12 intermediate revisions by the same user not shown) | |||
| Line 1: | Line 1: | ||
{{done}} | {{done}} | ||
If you would like to attach your site builder website to a subdomain of your domain, you will need to create a CNAME record, or an A Record within your DNS settings for your domain to point to your '''.bravesites.com''' address. | |||
== Create the Bravesites Website == | |||
'''First step is to create the Bravesites website:''' | |||
# Click on the Site Builder tab | |||
# Click "Create Site" | |||
# Once you've selected your theme you will be directed to the bottom of the page to continue to the next step. | |||
# Select " I want a Bravenet Site Builder subdomain " and enter your websites name like shown below. | |||
[[File:Create_bravesites.png]] | |||
== Assign subdomain to your Bravesites Website == | |||
'''Make sure you're on the 'Site Builder' tab'''<br> | |||
# Click "Add a Domain" | |||
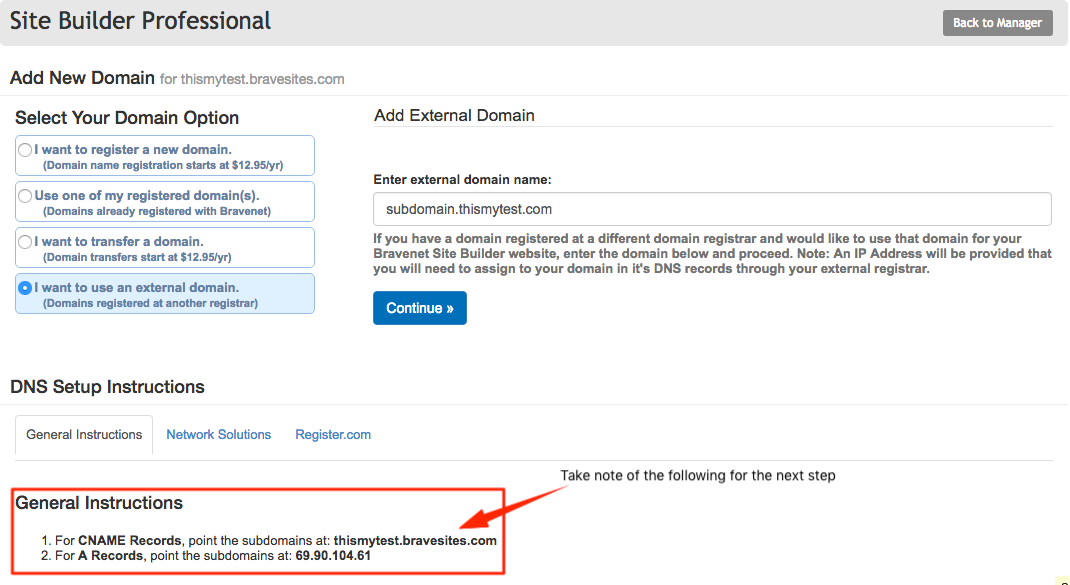
# Click "I want to use an external domain." | |||
# Enter in the name of the subdomain you wish to use for your domain. | |||
# Click '''Continue''' if you are satisfied with the name of your subdomain. | |||
[[File:AttachExternalDomainToBravesites.png]] | |||
== | == DNS Setup Instructions == | ||
'''There are two routes you can take to connect your sub domain to your Bravesites Website:''' | |||
=== | # Click Domains | ||
# Click on the domain you wish to manage | |||
# Click Manage DNS | |||
=== Option 1: To Create a CNAME: === | |||
1. Click "Add CNAME Record"<br> | |||
[[File:DomainsAddCNAMERecord.png]]<br> | |||
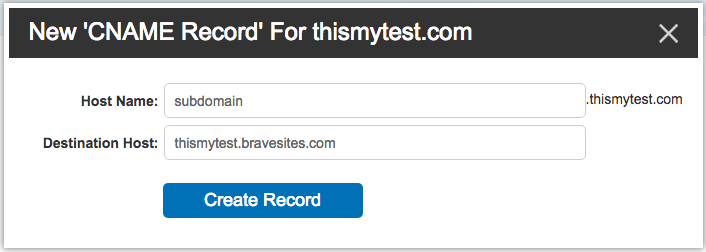
2. Enter in what you want for your subdomain '''(As shown below)'''<br> | |||
3. Enter in the .bravesites.com address for your destination host. '''(As shown below)'''<br> | |||
[[File:DomainsCreateCNAMERecord.png]] | |||
=== Option 2: To Create an A Record: === | |||
1. Click "Add A Record"<br> | |||
[[File:DomainsAddANAMERecord.png]]<br> | |||
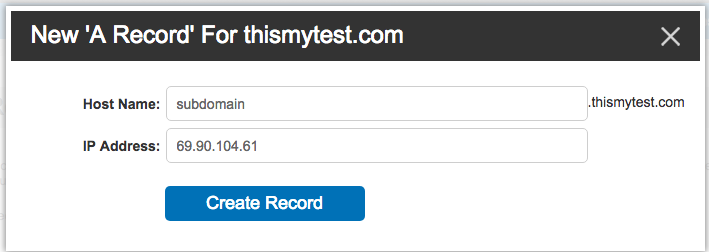
2. Enter in what you want for your subdomain '''(As shown below)'''<br> | |||
3. Enter in the IP address for your destination host. '''(As shown below)'''<br> | |||
[[File:DomainsCreateANAMERecord.png]] | |||
'''Please note:''' Anytime you make changes to the DNS records, it can take anywhere from a minimum of 1-3 hours, up to a maximum of 24 hours for DNS propagation to complete and update to the new values. During this period, you may notice that your website is attempting to connect to the old values even though they are no longer valid. As a result, you may see that your website is unavailable during that time. | |||
DNS uses a caching mechanism defined by the TTL (time-to-live). When records are changed, the DNS network is updated and goes through a process known as propagation, where all the global DNS nodes are updated. This takes time to complete. During this propagation period, traffic to your site will be going to either the old servers or the new servers. Once propagation is complete, all traffic will be going to the new server. | |||
[[Category:Websites]] | [[Category:Websites]] | ||
[[Category:Domains]] | [[Category:Domains]] | ||
[[Category:Getting Started]] | [[Category:Getting Started]] | ||
Latest revision as of 14:00, 27 April 2017
If you would like to attach your site builder website to a subdomain of your domain, you will need to create a CNAME record, or an A Record within your DNS settings for your domain to point to your .bravesites.com address.
Create the Bravesites Website
First step is to create the Bravesites website:
- Click on the Site Builder tab
- Click "Create Site"
- Once you've selected your theme you will be directed to the bottom of the page to continue to the next step.
- Select " I want a Bravenet Site Builder subdomain " and enter your websites name like shown below.
Assign subdomain to your Bravesites Website
Make sure you're on the 'Site Builder' tab
- Click "Add a Domain"
- Click "I want to use an external domain."
- Enter in the name of the subdomain you wish to use for your domain.
- Click Continue if you are satisfied with the name of your subdomain.
DNS Setup Instructions
There are two routes you can take to connect your sub domain to your Bravesites Website:
- Click Domains
- Click on the domain you wish to manage
- Click Manage DNS
Option 1: To Create a CNAME:
1. Click "Add CNAME Record"

2. Enter in what you want for your subdomain (As shown below)
3. Enter in the .bravesites.com address for your destination host. (As shown below)

Option 2: To Create an A Record:
1. Click "Add A Record"

2. Enter in what you want for your subdomain (As shown below)
3. Enter in the IP address for your destination host. (As shown below)

Please note: Anytime you make changes to the DNS records, it can take anywhere from a minimum of 1-3 hours, up to a maximum of 24 hours for DNS propagation to complete and update to the new values. During this period, you may notice that your website is attempting to connect to the old values even though they are no longer valid. As a result, you may see that your website is unavailable during that time.
DNS uses a caching mechanism defined by the TTL (time-to-live). When records are changed, the DNS network is updated and goes through a process known as propagation, where all the global DNS nodes are updated. This takes time to complete. During this propagation period, traffic to your site will be going to either the old servers or the new servers. Once propagation is complete, all traffic will be going to the new server.


